Tuesday, July 27, 2010

Figures 7-27-10


Here are a couple figures from tonight's figure drawing session.

Tuesday, July 20, 2010

Bonsai Material


I finally got around to taking pics of some of my better rough bonsai material which found it's way into my garden this year. The American Hornbeam is collected from the wild and next spring I will probably trunk chop it lower to induce taper lower on the trunk but it has really taken off with new growth in a short amount of time. The Corkbark Elm is really taking off as well. It will be trunk chopped next spring as well and I will take a closer look at the branches to see if any are worth keeping or if I should regrow them. Hopefully I can induce growth on the left but the aggressive growth I've seen so far, I would think it shouldn't be much of a problem. The Ponderosa Pine was collected in the Rockies at 5800' elevation and is approximately 100 years old. I am new with pine but this is my baby. Nothing will be done until I see it flourish and acclimate to my garden. I have had this one less than a week and still trying to find the best location in the yard to blast it with sun.

Tuesday, July 13, 2010

Figure Drawing 7-13-10


Here is a 20 minute figure drawing from tonight's session. This is Pan Pastel on paper. I really enjoy this medium for the soft painterly look that it provides. The product is a little tin, like a make-up container, with a compressed powder similar to pastel or charcoal. Not quite sure what it is exactly. It comes in dozens of colors but I have a set of greys. I have only used the black. The applicators are sold separately but they are small plastic palette knives with replaceable soft covers that slip over the tip and come in a variety of shapes. I use the triangle one almost exclusively. It is such a dark color that grabs the surface immediately which makes it difficult to gauge how much is on the applicator until it is on the paper so I often have a paper towel to wipe the excess off the tip. The triangle shape allows me to use both the soft pointed tip and the broad side to apply marks which works well with this length pose because I use line with the tip and the broader side to apply wider marks. Finding the right balance in this length of time between a line drawing and some subtle shading is always on my mind. Too much and it looks over worked. Too little and I didn't use the time to it's fullest to build up form and capture a sense of the light source and interplay between light and shadow.

Tuesday, July 6, 2010

No Model Again

Well, I haven't had a chance do any art since last Tuesday and was hoping to knock out some figure drawings tonight but the model called and canceled. I was kind of bummed about that especially since I drove 45 minutes there to find out because she was last minute in the cancellation.

Tuesday, June 29, 2010

Model No Show


The model was a no show tonight for figure drawing so we took turns doing quick sketches of each other. Here are a couple.

Sunday, June 20, 2010

Monica's "Body for Life" before and after


My wife entered the Body for Life challenge which she just completed yesterday. It is a 12 week diet and workout plan. I followed the diet with her but did my own workout plan and did not enter. I basically just ate cleaner and didn't want to enter the competition because I would've done my own workout plan and a stricter bodybuilding diet. It would've consumed all of my time and energy as bodybuilding show competitions have done for me in the past.

Anyway, Monica did an awesome job sticking with it and staying dedicated. As a result of all her hard work she transformed dramatically. She started 3 months post-pregnancy and ended 6 months post-pregnancy. She lost 11.5 lbs., 1"on her arms, 2.5" on her upper thigh, 3" on her lower thigh, 3.5" on her waist and 2.25" on her hips.

The key to success with this type of plan is that it isn't extreme. It's about balance, moderation, dedication. There is no starving. There is no cutting out macro-nutrients. There is no working out 2 hours a day. One eats 6 times a day and works out 6 times a week in sessions well under an hour. I am proud of her and I know that she is happy with the results. We just stocked up on the same groceries for this month as we did while eating under this plan so we will continue eating clean as we did while she was doing the program.

Wednesday, June 16, 2010

Skull Drawing


Here's a skull drawing I did today.

Tuesday, June 1, 2010

Frame for my drawing


I had this framed a few weeks ago and was given to my wife for our anniversary. Art Nouveau frame, 8 ply mat, and museum glass.

Saturday, May 29, 2010

Further Elm Work


As per some more reading, I decided to go back to this elm and "ring bark" it. The wire tourniquet method would've been less drastic as I started to do but you would have to wait for the trunk to swell and the wire to cut in to the cambium in order for a new root system to emerge (or the bark to simply grow around the wire which I don't want). The "ring bark" method as shown in the photos was what i just did to it yesterday. I used a sharp knife to cut the bark off around the tree about an inch high. I used a dremel to get into some hard to reach areas. I then surrounded the trunk with my mesh lathe stuff again and filled it up with "soil." Roots should emerge right along the upper cut. This will have to probably remain on the parent tree for one year before it establishes itself enough on the new root system. In the meantime I will fertilize heavily and allow as much top growth as possible to force the roots into growing.

Thursday, May 27, 2010

Elm Ground Layer


A few weeks ago I decided to try an experiment. What you see in these images is a species of elm that naturalized within some of my massive privet hedges. I've seen a number of these growing and over the years they were ruthless hacked back and whacked with the weed whip and just keep coming back. This particular one has developed burls and an overall ugliness to the trunk that I find appealing. The base is about 5" wide. I believe these might be a slippery elm. I tore off some leaves and when rubbing the petiole they have a slippery feeling. The leaves are very rough on the top surface and have a double serration along the the edge, alternating from large to small and the base of leaves have a non-symmetrical oblique and acute curve to them. Regardless of the species of elm, I will proceed with the explanation of the experiment. This tree's trunk curves well below and behind the underside of a privet. It is non-intriguing beneath the surface when I dug a couple inches below. It also has reverse taper between the burls and trunk line and would make removal difficult having to remove the huge privet and elm together. I decided to try ground-layering this. Right below the burl at the dotted line is the old soil line which was dug out to prepare for wire and a new soil medium as indicated in (b). This is where I took a heavy gauge wire and wrapped it tight around the trunk and tightened the wire as hard as I can with pliers, biting into the bark as shown in red in figure (c). I then took plastic lathe that I had from a home remodel project and cut a strip of it and wrapped it around the trunk and wired the two ends of the strip of lathe together as shown in (d) to form a "pot". I filled this up with a mixture of sphagnum moss and Turface MVP covering up some of the burl as well as indicated in (e). Over time, this trunk will swell and the wire will cut into the cambium. Theoretically new roots will begin to grow into the new medium directly above the wire. In an ideal situation this will take 8 weeks. Other times this will be left on until next spring. When the new roots colonize this "pot" I can remove the tree from it's old root system by sawing through the trunk below the wire and pot it up.

Tuesday, May 25, 2010

Figure Drawing 5-25-10


Not too many good figure drawings from tonight's session. Here is one with PanPastel.

Monday, May 17, 2010

Bonsai Bench


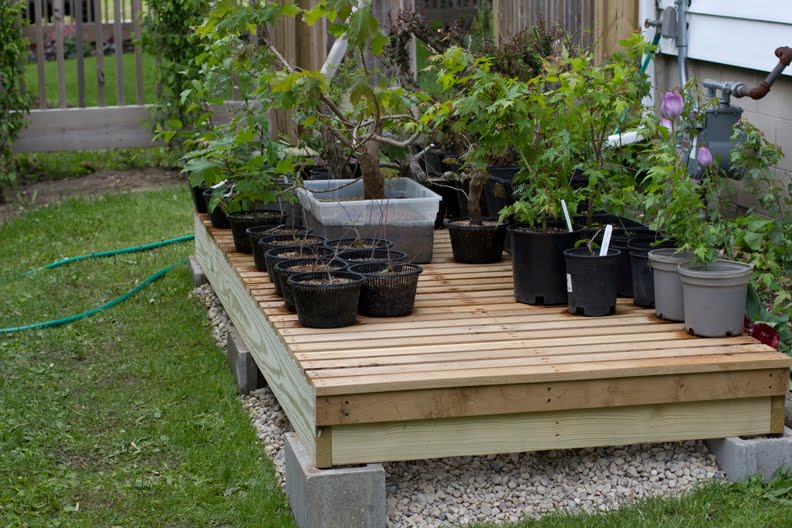
This is a bonsai bench I built for alongside the house. It measures 4x10. The decking is air-dried white oak that I got for free which I ripped down to 3" widths and spaced 3/4" of an inch. I dug out the sod and picked up 1 ton of washed gravel. This isn't a final display area but instead a place to allow my trees to develop. I hope that this area receives enough direct light. I measured between 5 and 6 hours of morning to early afternoon light. I may have to move some of the sun-hungry trees depending on how they do. I'm still undecided where to place a couple large Amurs which aren't in this area yet.

Monday, May 3, 2010

Heart Implant


This is a followup to Friday's post. This illustration depicts the implant being released and shows a coronal section through the left and right atrium.

Friday, April 30, 2010

Patent Foramen Ovale


Here is a product illustration I just completed. It's a delivery system for an implant in the heart. This implant is basically a spring loaded patch which seals a hole (Patent Foramen Ovale) between the right and left atrium. Each square of the patch sandwhiches the hole from both sides. The implant folds up inside the delivery system as it is being passed through an artery and into the heart and released when in place.

Tuesday, April 27, 2010

Figure Drawing 4-27-10


Here are a few quick figure drawings from tonight. The two "softer" ones are Pan Pastel and the other is charcoal pencil.

Friday, April 23, 2010

Graphite Figure Drawing


I just completed this today. It is graphite and white chalk on an off-white Hahnemühle Ingres Antique Paper. 16"x8"

Tuesday, April 13, 2010

Figure Drawing 4-13-10


Here are my figure drawings from tonight.

Tuesday, April 6, 2010

Figure Drawing 4-6-10


Here are a couple quick figure drawings from tonight's figure drawing session.

Thursday, March 25, 2010

Spot Illustrations


Here are some spot illustrations I've been working on this week.

Thursday, March 18, 2010

Tim Burton Barberry


I couldn't resist drawing up a virtual for this barberry (yesterday's post). Maybe it has a future looking like a tree out of a Tim Burton film.