Saturday, January 30, 2010

Self Portrait


I finished this self portrait this weekend. It is drawn from a mirror in charcoal on Strathmore Bristol Plate Surface paper (14x17). I don't have a scanner large enough so the photo is bad.

Sorry for two images. I tried a different camera but with not much luck.

Thursday, January 28, 2010

Dovetailed Box


I haven't posted for awhile so thought I'd post this box I completed in December. Made of Curly Maple and Walnut. Hand planed and hand cut dovetails with Linseed Oil, Shellac, and Liberon Wax as the finish. Lined with deer hide.

Saturday, January 23, 2010

Walnut and Legends

My parents dropped off some walnut yesterday. They've been cleaning up my grandparent's house to sell. My grandpa passed away in '91 and was a hobbyist woodworker. He built furniture for his children and grandchildren. The lumber I received of his isn't much, probably some cutoffs and smaller pieces that he never got around to use. I'm excited though. I hope to create something special knowing this was the same stock he used 30, 40, 50 years ago.

2009 marks the passing of two woodworking legends. The term woodworker doesn't do justice to describe them as they were artists of wood. Sam Maloof and James Krenov are the two I am referring to. Both lived long lives and worked with wood until the end. I wish I would've had the pleasure to have met them. Numerous articles can be found on them along with numerous knock-offs. Do a google image search on the Maloof rocker or Krenov cabinet and see what it yields. Maloof often took raw lumber and said that the bandsaw was his pencil and would pass the wood through to create sinewy curves as part of his furniture relying only on his eye to judge without creating jigs and drawing curves prior. Krenov's sight was failing in his old age and much of what he did was by feel toward the end. It truly makes me wonder if we'll ever see again woodworking icons as these two men were.

3rd Floor Studio


I'm posting these pictures to help motivate me. We live in a 90 year old house that has a 3rd floor/attic that I've been finishing to become my studio/work-space. Well, I stalled out weeks ago. Part of it was the joys of having a new baby (Dec. 16th), the holiday season, mixed with other things going on which slowed progress. New electric and plumbing was ran. Windows and skylights were installed to bring in more light and to offer views of the lake and a near aerial view of my backyard. I framed up a half-bath and knee walls along with other drywall backers. Insulating was a pure joy (just kidding)! Lugging 60 sheets of drywall up multiple flights of stairs was taxing. Working with multiple roof lines and angles was a nightmare for a drywall novice like myself to mud and tape (90+ hours). All outside corners were treated with a 1/2" bullnose to help soften the angles. I think I went through something like 40 gallons of drywall mud...I don't want to remember. Various stages made me appreciate trades-people who do this as a living as it's an art-form in itself which was humbling since I was nowhere near mastering. Then I decided I will make my own hardwood flooring. I went to my hardwood mill, picked up rough-sawn White Ash, and had it planed down. Ash is an under-used domestic hardwood with nice varying dark and light shades. It is traditionally used as tool handles and baseball bats as it is harder than red oak. I ripped the planks into 3 different widths, 2.5", 3.5", and 4.5" to add visual interest and try to minimize waste. I purchased industrial tongue and groove cutters and adapted those to my router table and assembled a make-shift dust and chip collection system and had at it. It was loud and intimidating. I then routed multiple shallow grooves on the underside of my boards as hardwood floors have this. I still don't know why for certain this is done. I've read that it helps eliminate some cupping and warping. I also have seen that it helps air circulate on undersides of boards. Whatever the reasoning, I went for it. Laying it was an entire other tedious task that I won't get into here. So...here I am now. As shown in the pictures, I have to sand and finish the floor which I'm nervous about. I need to mill and paint my trim-work and install. I have to install my light fixtures and outlets and move up there. I will lay tile in the half-bath and install a toilet and pedestal sink. Ohhh...I still need to build window seats for the dormers yet! We'll keep you posted!

Friday, January 22, 2010

Old Elm

I saw this article a couple weeks ago on msn and returned to it again today. Wow! There certainly is a lot of bittersweet history behind this magnificent old elm tree.
http://www.msnbc.msn.com/id/34765157/

Exercise/Stretching Illustrations


As I await a conference call in about a half hour regarding these illustrations I've been working on, I thought I'd make a post. I have about thirty something illustrations for a drug company depicting exercises and stretching, both male and female, that I've done first rounds of. The age group they requested is about 10 years older than my wife and I and are to have a good fitness level in appearance. I often use us as models for illustrations and did so for these. The challenge is trying to draw us 10 years in advance. Especially with the close-ups, I had to pay special attention to this. It's difficult to draw wrinkles and other details in a convincing manner as I feel these wrinkles, when drawn, sometimes simply make the face look "dirty and streaky" instead of natural. Thinking about it, I believe aging wrinkles usually occur perpendicular to the direction of muscle fibers which makes sense since the skin will fold perpendicular to the direction muscles contract and over time, exposure, etc. the skin will lose elasticity and that loss of recoil in the skin will show. I will also have to draw figures of various ethnic backgrounds as well for these because they will be presented in international markets.

Thursday, January 21, 2010

Another Figure 2


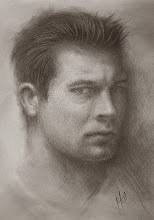
I did another brief figure session last night. I just don't tire of the human figure. This is probably why I draw body parts for a living. It introduces infinite challenges and possibilities. My first sketch is the large one on the bottom of the page. These pages are 18x24 to give you a scale reference. I worked much too close to the model and did not work the entire figure as a whole. It looks disjointed, choppy, and timidly drawn. I wasn't loose and thought too much about each part. The top one is the same model and I just relaxed and drew. I like the outcome better.

As I analyzed this afterward, many analogies came to mind. Too much thinking inhibits the hand and fluidity of the drawing. Take an NFL game in which a quarterback is throwing interceptions and getting frustrated. You often hear about the coach addressing the QB with things like, don't think too much and to play instinctively. They are not simply reacting to the situation and are thinking too much. In that game, there isn't time to think and analyze too much. You must rely on instincts and muscle memory from all the hours and days of practice and breaking down plays and attacking each element of the game.

I never played football but instead ran track as a sprinter and jumper. Have you ever watched and analyzed a world class sprinter? Take for instance someone who just won the 100m and you watch the race in slow motion. Their jaw is relaxed as the facial muscles bounce with each stride and their quads contract and relax upon hitting the track. They ran their race. They allowed it to just happen and not think too much. Now watch it in real time. It was a blur. Do you think the sprinter had the time to analyze each stride? When you think, you tense up, your stride becomes choppy. You do not allow your muscles to work in unison as they should relax and contract in synergy. Now look at the 2nd and 3rd place guys and down the line. Yes, it might be the agony of defeat on their faces but more than likely they did not run their race. They realize they're behind, tense up, and begin thinking "run faster, contract muscles harder, etc". They lost track of running their race.

All this might seem like a far stretch from drawing but I feel so much of what I do and did, when analyzed, will often parallel one another.

Wednesday, January 20, 2010

Amur Maple Virtual


Peering out at the grey sky, I'm becoming anxious for spring. Here in Wisconsin, it will be quite awhile before the change of the season. With this in mind, I'm posting one of my Acer ginnalas (Amur Maple). I did this "virtual" of my proposed future for the tree. I bought the tree late fall at a nursery when all the end of season sales happen. I first began digging in the nursery pot to remove about an inch and a half of soil to see the most important part, the roots and basal flare where the taper between trunk and roots occur. Analysis of this region helps dictate the future design of the tree. Pleasing taper of trunk and strong, well arranged radial roots on the surface help to sell the image of a tree that is aged as this arrangement makes the tree appear that it is gripping the earth with a solid footing. The tree was grown as a shrub with multiple trunks(as this species often is). It stands about 5 feet tall but 90% of it is useless in my design. Early spring I will trunk chop at or near the black lines and regrow a single trunk. The new potting angle will probably be rotated 10 or 15 degrees clockwise as seen and will help "open" up some of the angles of the trunk. Since the time at which these shots were taken, I have potted up to a 5 gallon nursery pot from the 3 gallon seen here to help encourage rapid growth and more trunk girth. This tree will not see a bonsai pot for many years and will probably take about 10 years to reach the virtual shown. Hopefully during the course the bark will develop a patina which will help make it look like an aged maple. In the meantime my focus will be growing a trunk. Once that is achieved, then I will focus on branches, refinement, and ramification.

Another Figure


I had a chance to do some more figure sketches last night. Here is one of them. Even though it's only a study, I try to accomplish a number of things. One element I failed at was composition. I've been attempting to fill the page with the entire figure and in this one I ran out of paper on the left. There is one good point to be made however and that is, as soon as I knew that the figure would not fit I did NOT try to conform the figure to the given space. By this I mean, it is easy for one to adjust proportions to accommodate for the space given. I fall victim to this sometimes and this time I made a conscious effort to not do so. I'm pleased with my effort for not fussing around with the face and it matches my efforts with the rest of the form as I laid down minimal squiggles to capture the likeness of my model. On future efforts I would like to lay down fewer strokes to capture outline instead of multiple sketchy passes. Calligraphic confident single strokes would better indicate that I am able to capture the figure as I see it without going back to rework...almost in an effortless attempt. John Singer Sargent went to great lengths to make his art appear effortless and spontaneous as though every mark was intentional and necessary to capture his vision without appearing overworked. Some of this and probably most of this comes through practice but other times when efforts failed to his eyes, he started over.

Tuesday, January 19, 2010

Figure drawings


In the last few days I decided to pick up figure drawing (drawing from life) again. I'll tell you what, it was certainly difficult to lay down the first strokes of charcoal as it has been a long time since working like this (10+ years). I started with large sheets of paper on my easel as I felt this would give me more freedom and range of motion of the arm to create quick and gestural drawings. These two are between 2 and 5 minutes long...I did not time them. I'm guessing now that they are in the 5+ time range now but over time and practice I will shorten the pose time once I gain more confidence and coordinate my hand and eye on a more instinctive level. The purpose of these were to record the essence of the figure in foreshortened perspective with no "shading" and with only line to dictate the form. Proportions must be worked out and achieved quickly in order to lay down the entire form in a convincing manner. There was a sense of freedom working this way since they are raw and honest with no time to dilly-dally with making a "pretty finished" drawing. It was back to the basics and I learned a lot. I look at them now and can nit pick them to death but because of this, I can hopefully move on and improve with future sessions.

Sourcebook page and first post


This is my first post. I will begin with an illustration which I completed the layout for this morning. It is a self-advertising piece for the 2010 Medical Illustration Sourcebook. I'm not quite sure of my goals for this web log in regard to frequency of postings. At this beginning stage it would be nice to say that I will be ambitious and post something new each day but I'm sure it "ain't gonna happen." Feel free to view past works of mine on my website at www.bodyrender.com